
This post is a brief introduction to Git and it's commands. Made specially for those who are just starting out with Git, GitHub and their carrer in IT.
Also for those who are just curious.
Introduction
My journey with Git started in 2021/22 when I began my Degree in Computer Science. My teachers recommended it to me for group project and right of the bat I was amazed by it's capabilities; a place for your group code that allowed everyone to access it and throw their changes in the same place and resolve conflicts? That was genius! It's exactly what developers need and that's why it became the standard.
What is Git?
As i already said previously, Git is a software that allows you to store your code in a repository where your whole group can see it and work on it. You can also resolve conflicts like when you and your colleague are working on the same file and you both change the same line. Git will let you know that there is a conflict and you can choose which change to keep or if you want to keep both.
The four stages of Git
A thing I find very interesting about GitHub is that it has four places (stages) to store your code:
Working Directory: This is where you work on your code. You can create, edit and delete files here.
Staging Area: This is where your code goes when you add it but you haven't committed it yet.
Local Repository: This is where your code goes when you commit it. This is your local copy of the repository.
Remote Repository: This is where your code goes when you push it. It's the repository that is stored on GitHub and it's what everyone else sees and pulls from.
Keep this in mind because it's going to be important.
How to use Git?
To get started with Git first you need to install it on your machine. Then go to GitHub and create an account. Once you have your account, you can create a new repository and clone it to your machine or you can create a repository from a local folder.
Creating a new repository and cloning it
If you choose to create a new repository and clone it to your machine what you'll need to go is go to GitHub and create a new repository. Then go to your terminal, change your directory to the location you want your repository to be and run the following command:
git clone <repository-url>
This will create a new folder with the same name as your repository and clone it to your machine.
Creating a repository from a local folder
If you already have a local folder with your code and you want to create a repository from it, what you'll need to do is go to your terminal and change your directory to the location of your folder. Then run the following command:
git init
This will create a new folder called .git (which you probably won't see in your file explorer because it is a hidden folder) in your folder and it will be ready to be pushed to GitHub. Warning: DO NOT change the content of the .git folder as you can lose the data in your repository. The next step is to go to GitHub and create a new repository. Once you have your repository created, go back to your terminal and run the following command:
git remote add origin <repository-url>
This will add the remote repository to your local repository so they become linked.
Making changes and applying them
Well now you have your repository created and linked to your local folder, very nice! Now it's time to work! Let's say you created or changed a file in your working directory and you want to send your changes to the remote repository on GitHub. In order to do that you can follow these steps: Run the following command:
git add .
This will add all the new/changed files in your folder to the staging area, to commit it to the local repository you'll need to run the following command:
git commit -m "Initial commit"
This will create a new commit with all the files in the staging area. Now all that's left to do is push your changes to the remote repository. To do this, run the following command:
git push -u origin main
This will push your local repository to the remote repository on GitHub assuming that your main branch is called main. If your main branch is called master, just replace main with master. Now all of your changes have been applied to the remote repository and you can see them on GitHub.
Pulling changes
Now let's say you and your colleague are working on the same repository and he made some changes to the code and pushed it to GitHub. You saw those changes and they're nice so you want to pull them to your local repository so you're up to date with the project but you don't know how to do it. I got you covered! To pull the changes from the remote repository to your local repository, run the following command:
git pull origin main
This will pull the changes from the remote repository to your local repository and merge them with your local changes. But what if just wanna check for new updates but don't want to merge them right now? Or maybe you are working on new features and you want to avoid potential conflicts? Worry not my fellow developer, you can do that too! Remember when I told you about those four stages of Git? Well, the pull command grabs the changes from the remote repository and merges them directly with your local changes, however if you run this command:
git fetch origin main
or just
git fetch
What this command does is it grabs the changes from the remote repository and stores them in your local repository but it doesn't merge them with your local changes. This way you can check the changes and decide if you want to merge them or not.
Branching
One of the things I learned fairly recently about Git (and one of the most important and useful ones) is that generally speaking, you should not work directly on the main "branch". First things first, what is a branch? Well a branch, like the name suggests, is similar to a branch of a tree. The main branch is the trunk of the tree and the other branches are the other branches of the tree. When you create a new branch, you're creating a new "trunk" that is separate from the main trunk and it has all the main trunk's data up to that point. This way you can work on new features without affecting the main branch and when you're done, you can merge your branch with the main branch. This is useful because it allows for your changes to be reviewed and tested before being merged with the main branch in order to avoid breaking the code. You can also create branches from other branches, again like a tree. To create a new branch, run the following command:
git checkout -b <branch-name>
This will create a new branch with the name you provided and switch to that branch. To switch back to the main branch, run the following command:
git checkout main
I personally get lost inside branches sometimes so I like to run the following command to see all the branches in my repository:
git branch
Plus if you want to see last commit in each branch you can run:
git branch -av
In case you're done with a branch and you want to delete it, you can do this:
git branch -d <branch-name>
Use cases
Now that we've covered the basics, let me give you some examples of tough situations where I found myself in and how to get out of them.
So the other day I was working on some unit tests and i kept having to correct small things because the PR was failing the tests so my commit history was full of repetitive and unnecessary commits. It looked a little bit like this:
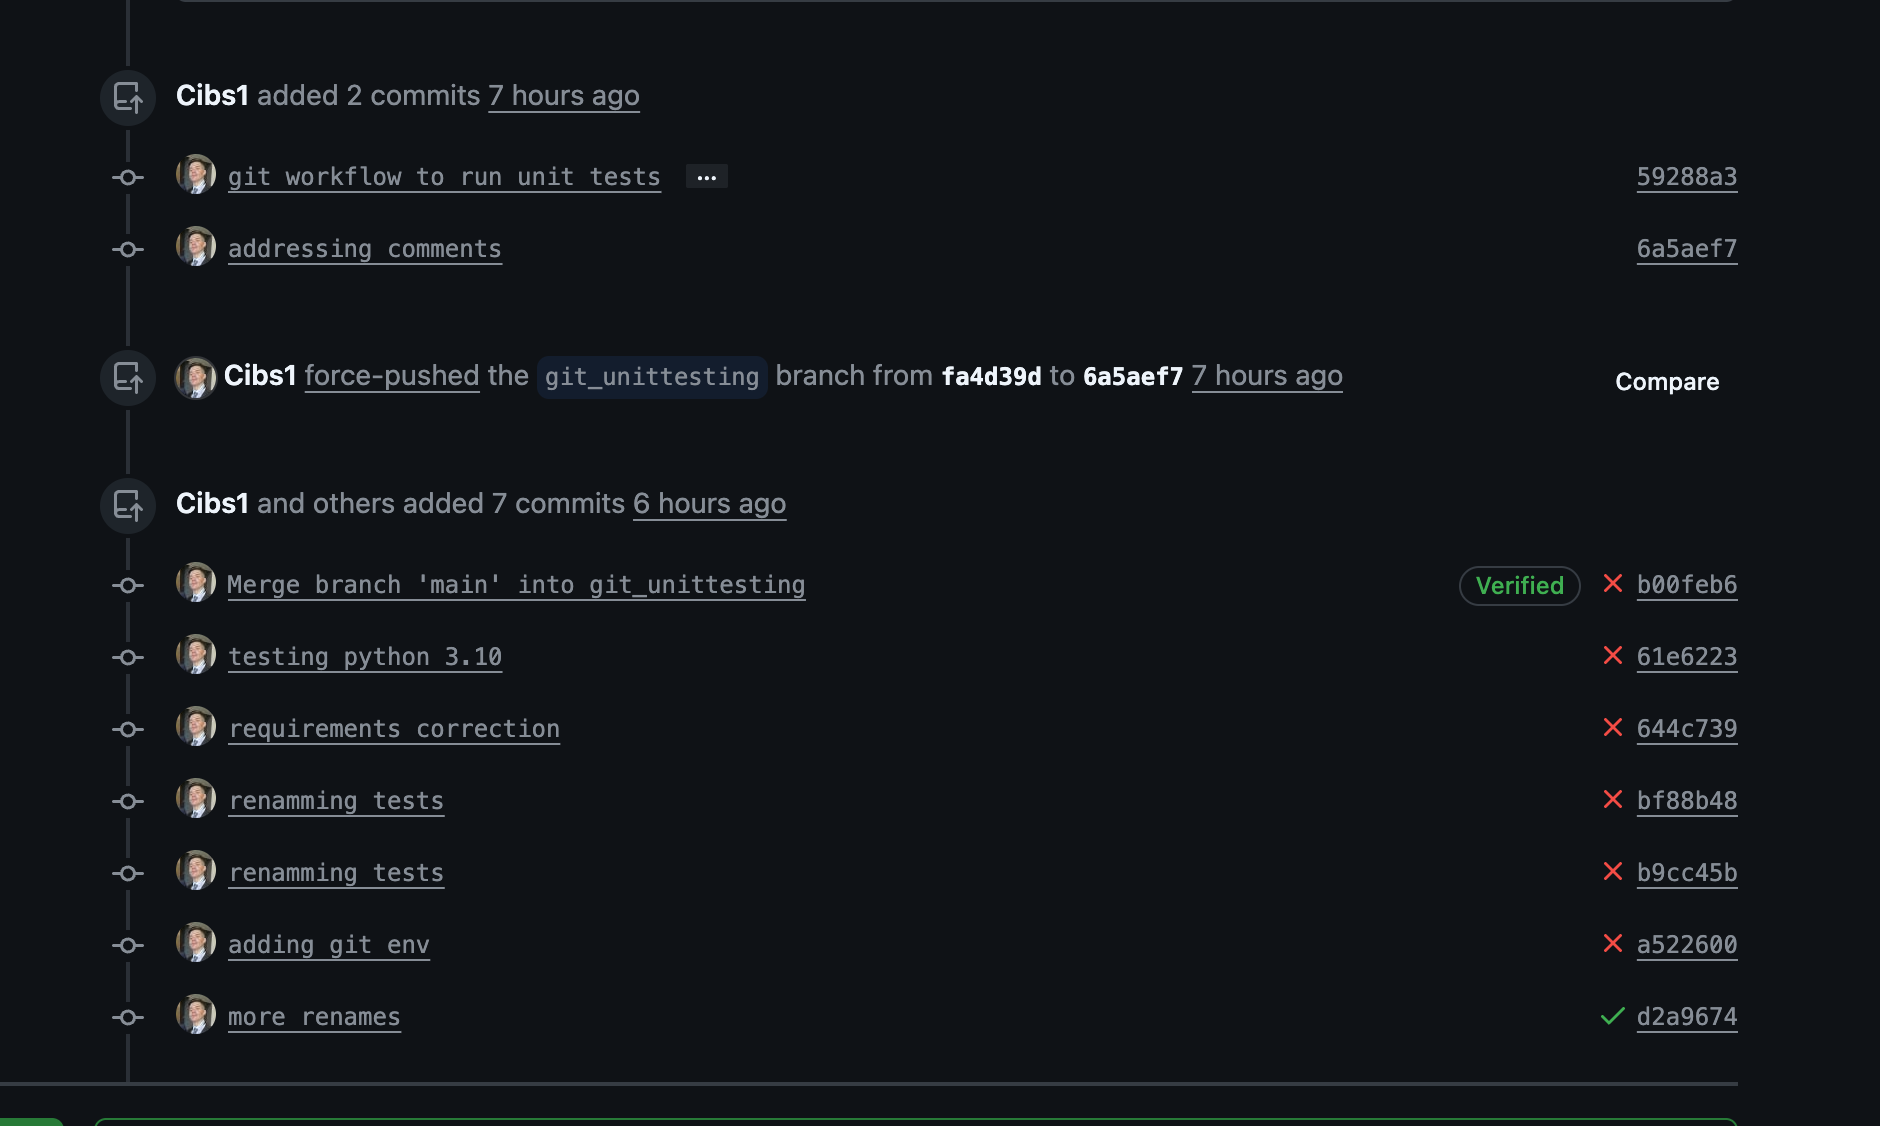
To fix this i did a rebase which basically allows you to rewrite your commit history and combine several commits into one. I had like 9 commits so i did this:
git rebase -i HEAD~9
then I pressed i to enter interactive mode and then I wrote the squash before every commit but that i wanted to combine. After that i pressed esc and then :wq to save and quit. Then i had to force push and then i only had like three commits left. Be careful though, because if your colleagues are working on the same branch as you, they might have already pushed their changes and you'll have to resolve conflicts. Plus in the interactive rebase their commits might appear aswell and the whole history will turn into a mess.
If you want more information on git rebase or other commands, they're following the use cases so just scroll down a bit :) .
Use Case 2
The other day I was working on a feature and I had to add a function to a different repo, the problem was that I had another feature that i implemented but the commits were all mixed up with the commits from my colleagues so I couldn't push my function before correcting the history. So what I did was I reseted the branch to a previous commit before I had all the unwanted commits and then implemented the function. So first I had to stash my changes with:
git stash
Then I checked the logs to see the commit hash of the commit before I had all the unwanted commits:
git log
Then I reseted the branch to the commit before the unwanted commits and checked:
git reset --hard <commit-hash>
I also had to fetch and rebase to origin main to make sure I was up to date with the main branch and make sure that worked using git log:
git fetch && git rebase origin/main
git log
After that I unstashed my changes and committed the new function:
git stash pop
git add .
git commit -m "Implemented the function"
git push origin main
Use Case 3
Other time something similar happened but it was more straightforward to solve. I had a lot of commits with minor corrections and I wanted to squash them into one commit. So first I checked for changes in my current branch:
git status
Then I stashed them with git stash and I switched to the branch where I all the commits were, then I checked the history of the branch:
git log
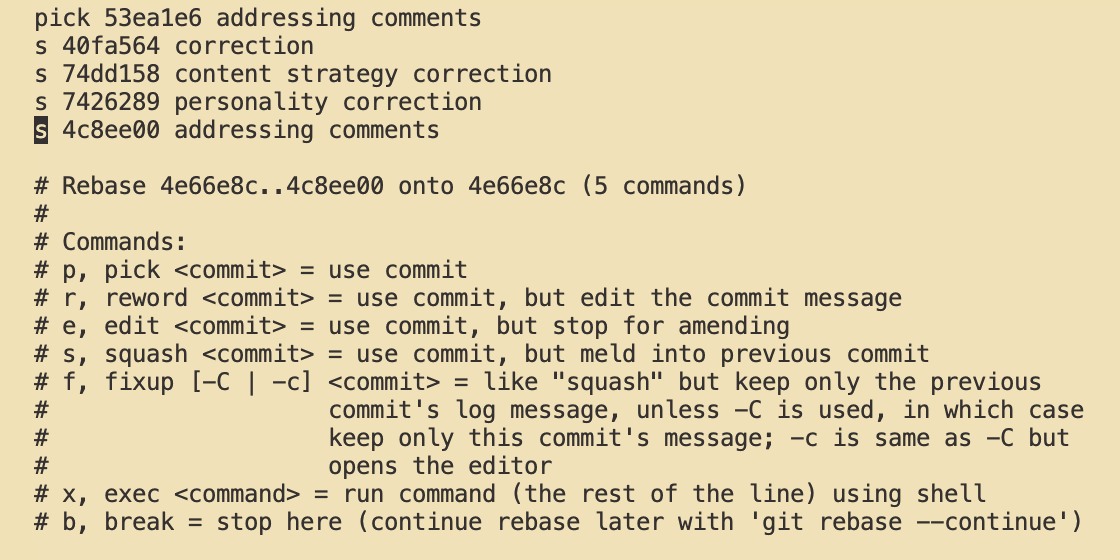
I saw I had 5 unwanted commits so I did a rebase with the following command:
git rebase -i HEAD~5
As you can see in the image below, I squashed the last 5 commits into the older one:
At first the rebase failed for unknown reasons:

So I aborted the rebase with the following command:
git rebase --abort
Then I tried again and it worked to i had to choose which commit messages i wanted to keep and comment or delete the rest (you can delete them by pressing escape to enter editor mode then go to the line of the message you want to delete and double press 'd').
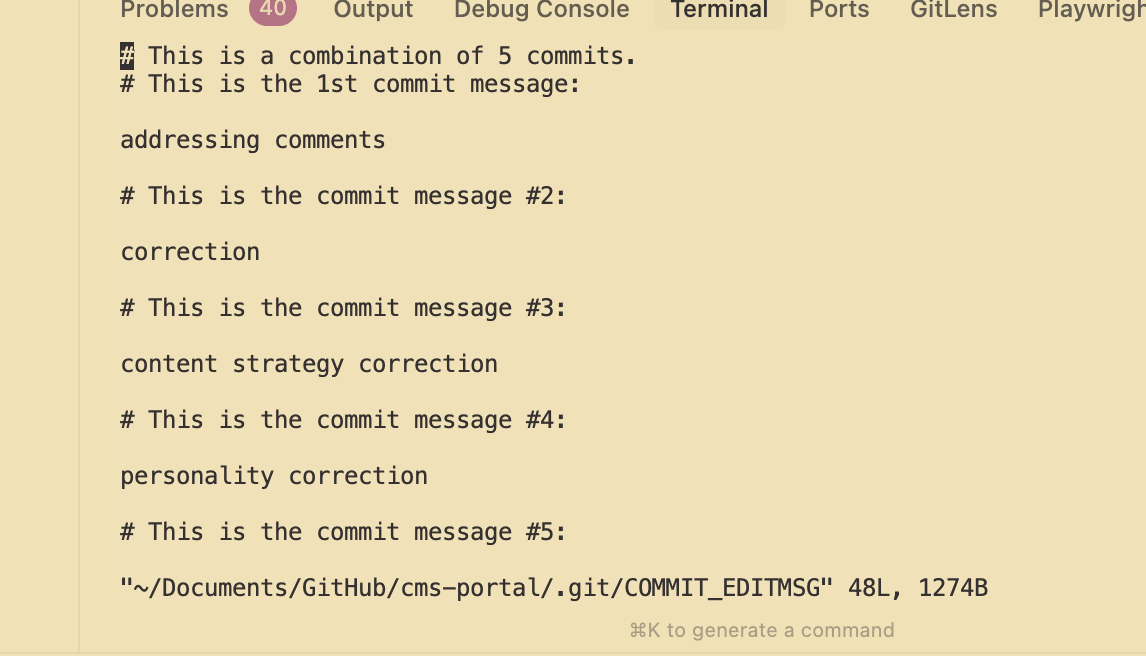
After that I just pressed esc and then :wq to save and quit and then I had to force push:
git push -f
Use Case 4
The other day I finished a ticket then I realized the I had a bunch of local branches that had already been merged and closed on the remote repository. So what I did to delete them was I first checked which ones were already merged and closed on the remote repository. So I ran git prune:
git prune origin
This command gave me a list of branches from origin but most importantly it highlights the closed branches the next time I check my local branches with:
git branch -av
So I could see which ones were already merged and closed on the remote repository.
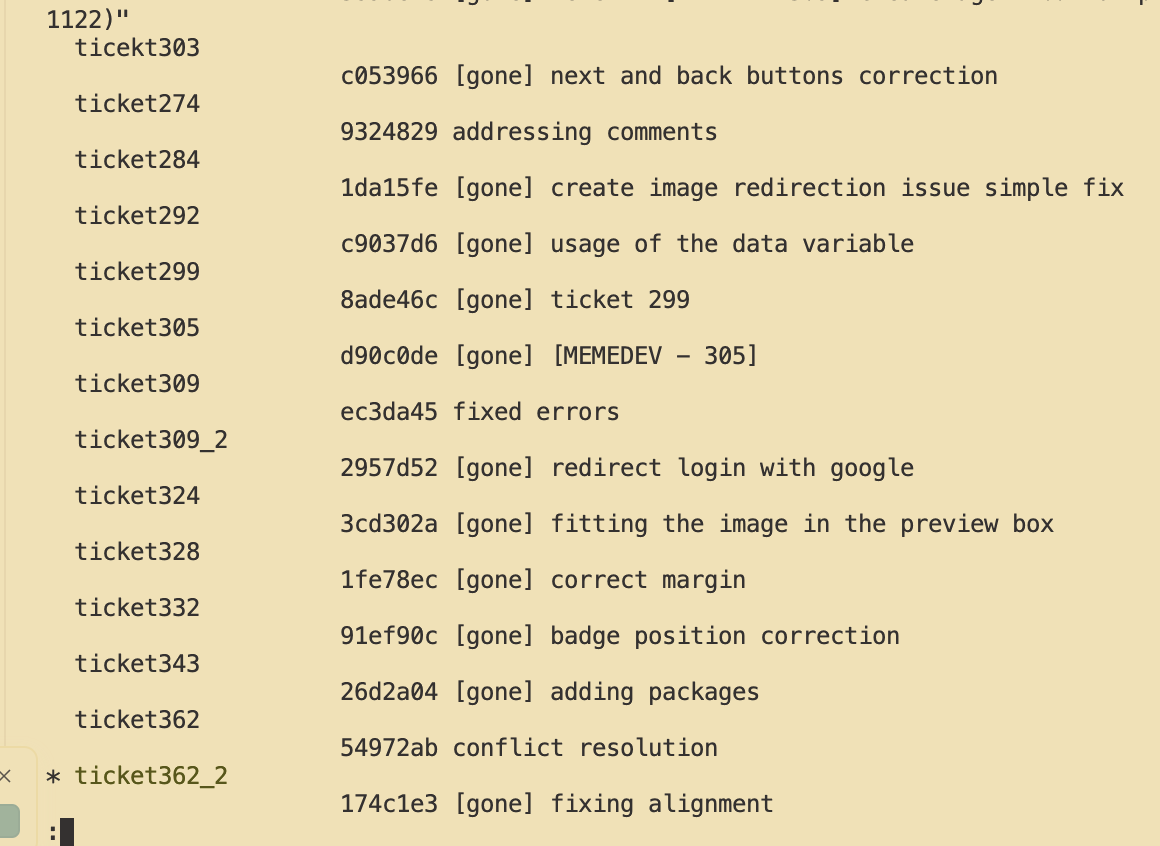
Now i just had to delete the branches that had the [closed] tag.
git branch -d <branch-name1> <branch-name2> <branch-name3> ...
Now I'm going to give you some definitions of git commands you're likely to need starting you're IT carrer.
Checking the status and history of your repository
Another very important thing that you should know is this command:
git status
It allows you to see a lot of information like what branch you're in, if you have any changes in your working directory, if you have any changes in your staging area and if you have any changes in your local repository that haven't been pushed to the remote repository. This command is very useful because it allows you to see the status of your repository and what you need to do next. You can also check the history of your repository, it's commits and their comit hash which is a unique identifier that's very useful like for sometimes we'll talk about in a bit. You can check it by running the following command:
git log
Merging branch with main when main is out of date
Now let's say you created a new branch and you worked on it for a while and now you want to merge it with the main branch but the main branch is out of date, try to visualize it with this example:
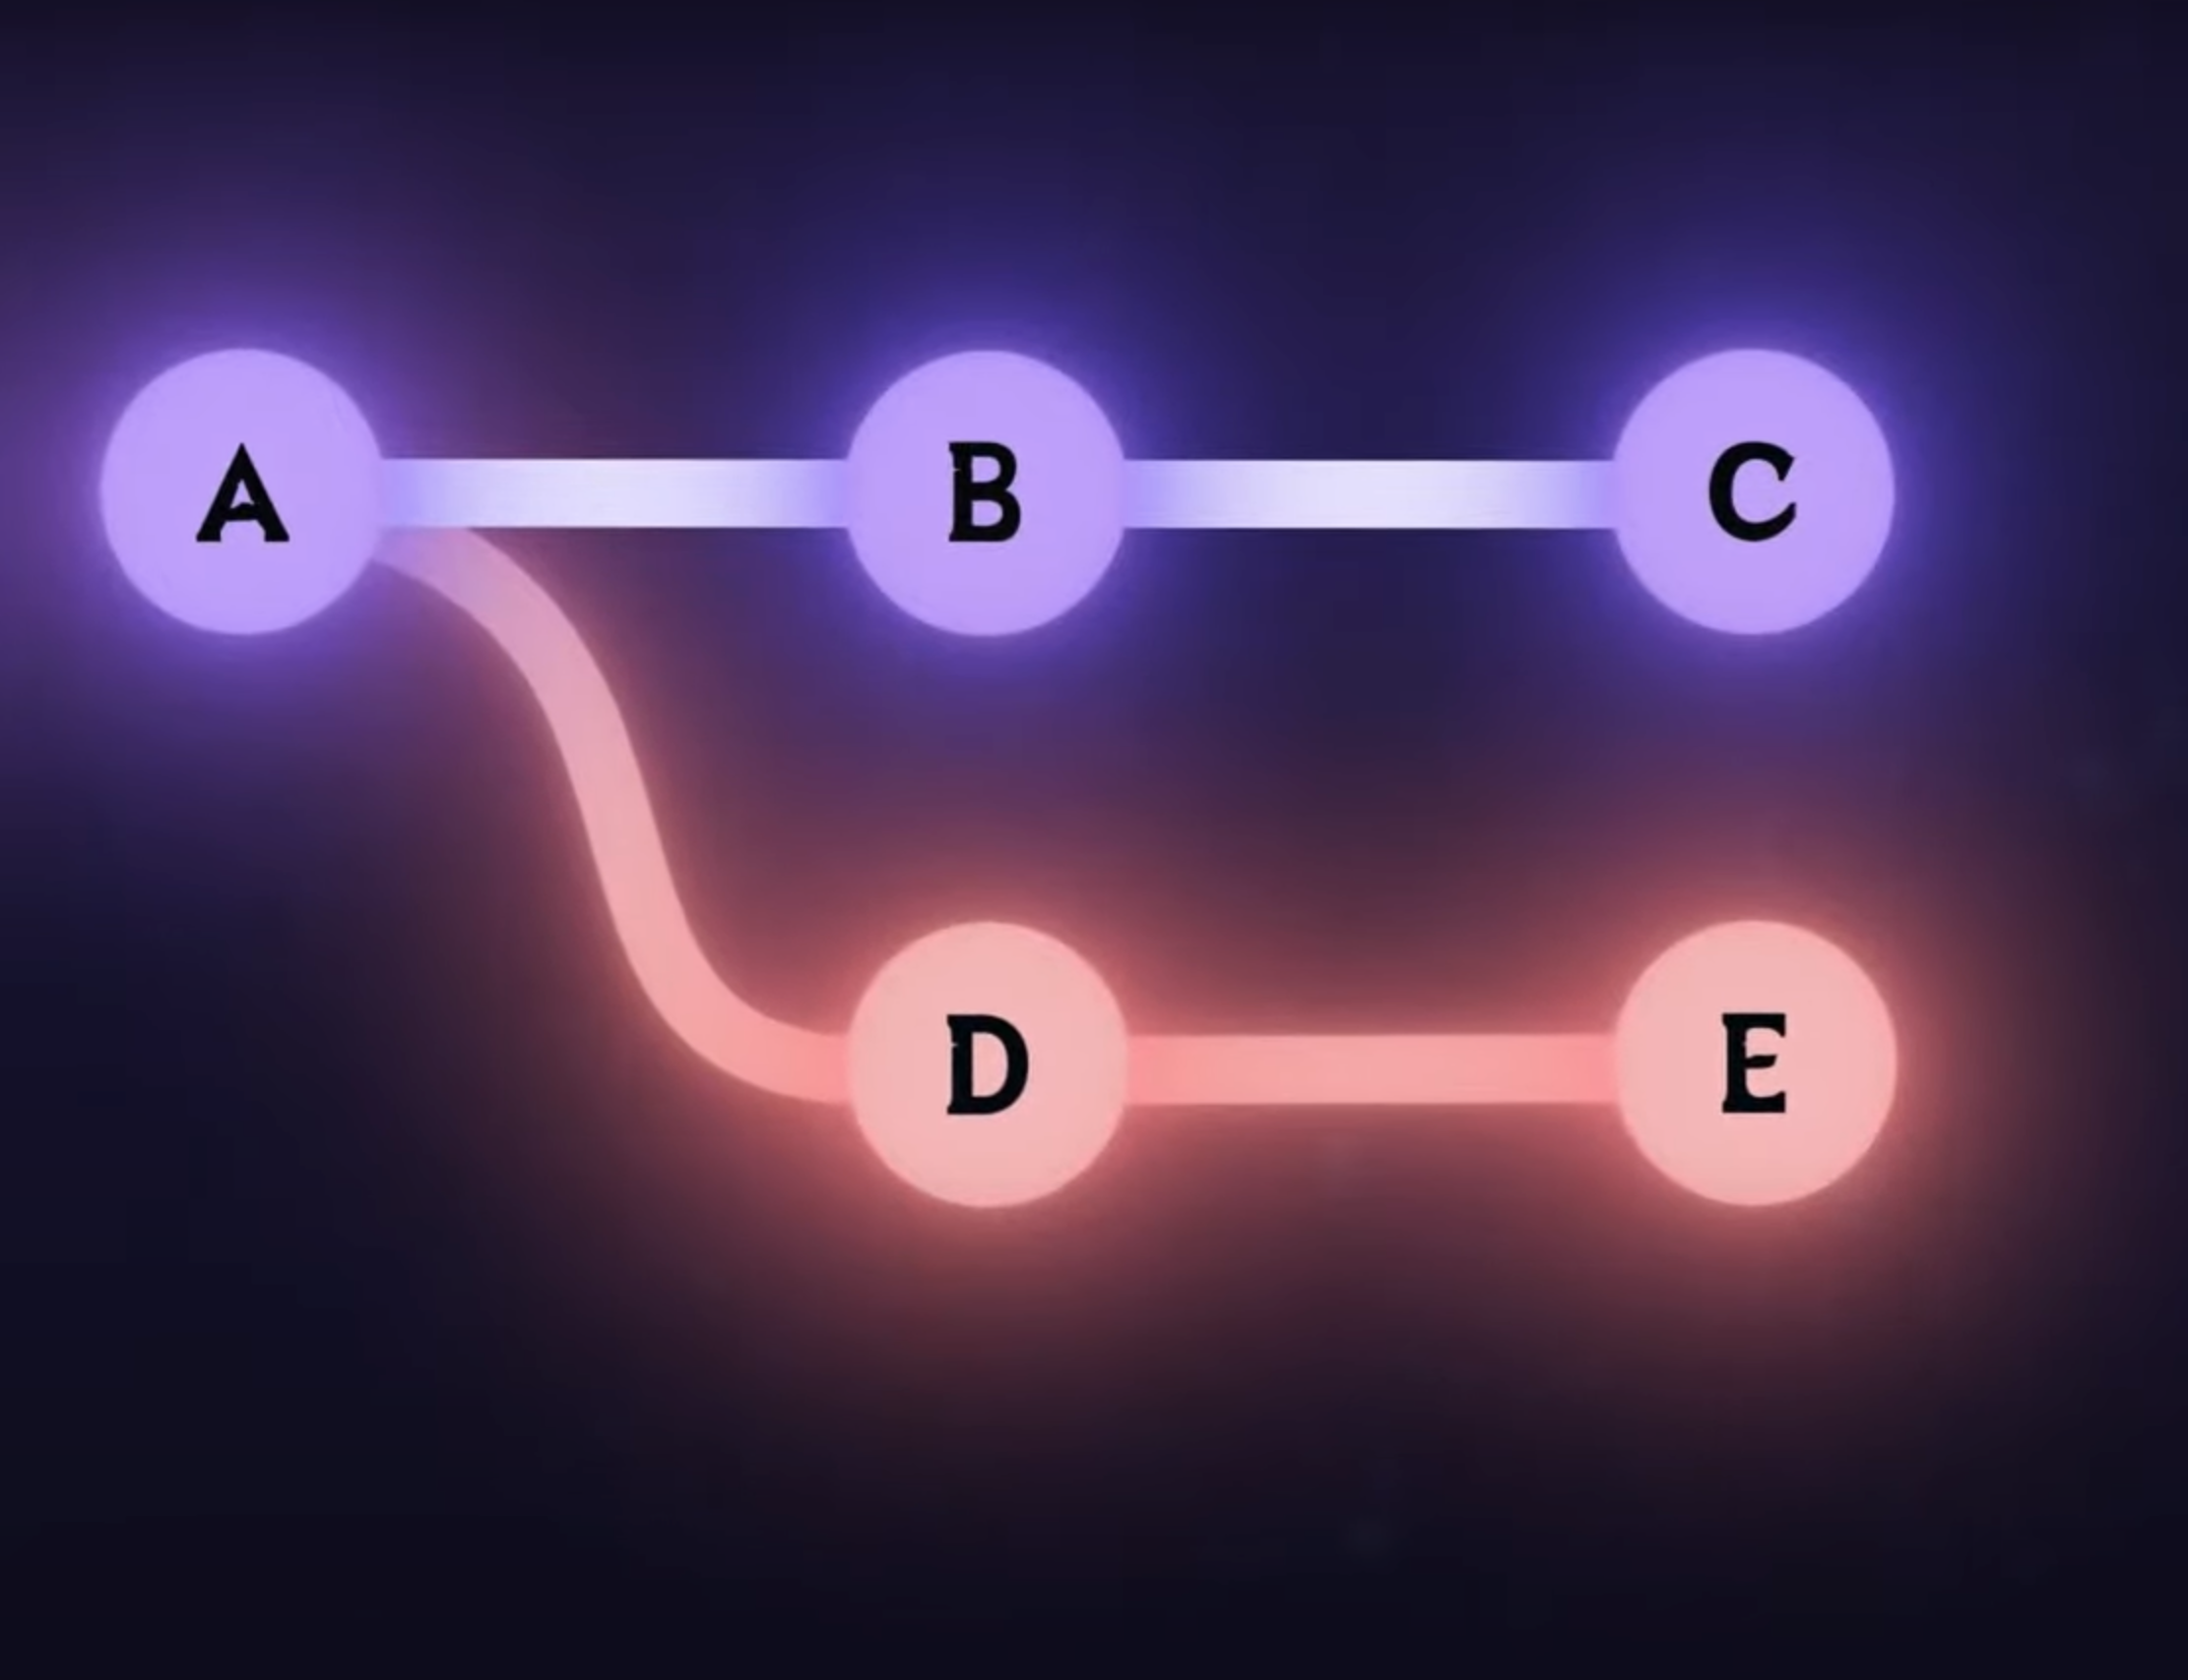
Image credits: Boot dev - https://www.youtube.com/watch?v=nHcfoHOW4uA
So in this case you created a branch in point A of main and did 2 commits on it (point D and E), problem is, someone updated the main branch with 2 other merges (point B and C) and now you want to merge your branch with the main branch but your main branch is outdated so you have conflicts. In this case, you can do a rebase which is basically taking your branch and putting it on top of the main branch. To do this, first you need to switch to your branch (in case you're not already on it):
git checkout <branch-name>
Then you need to run the following command:
git rebase main
This will look something like this:
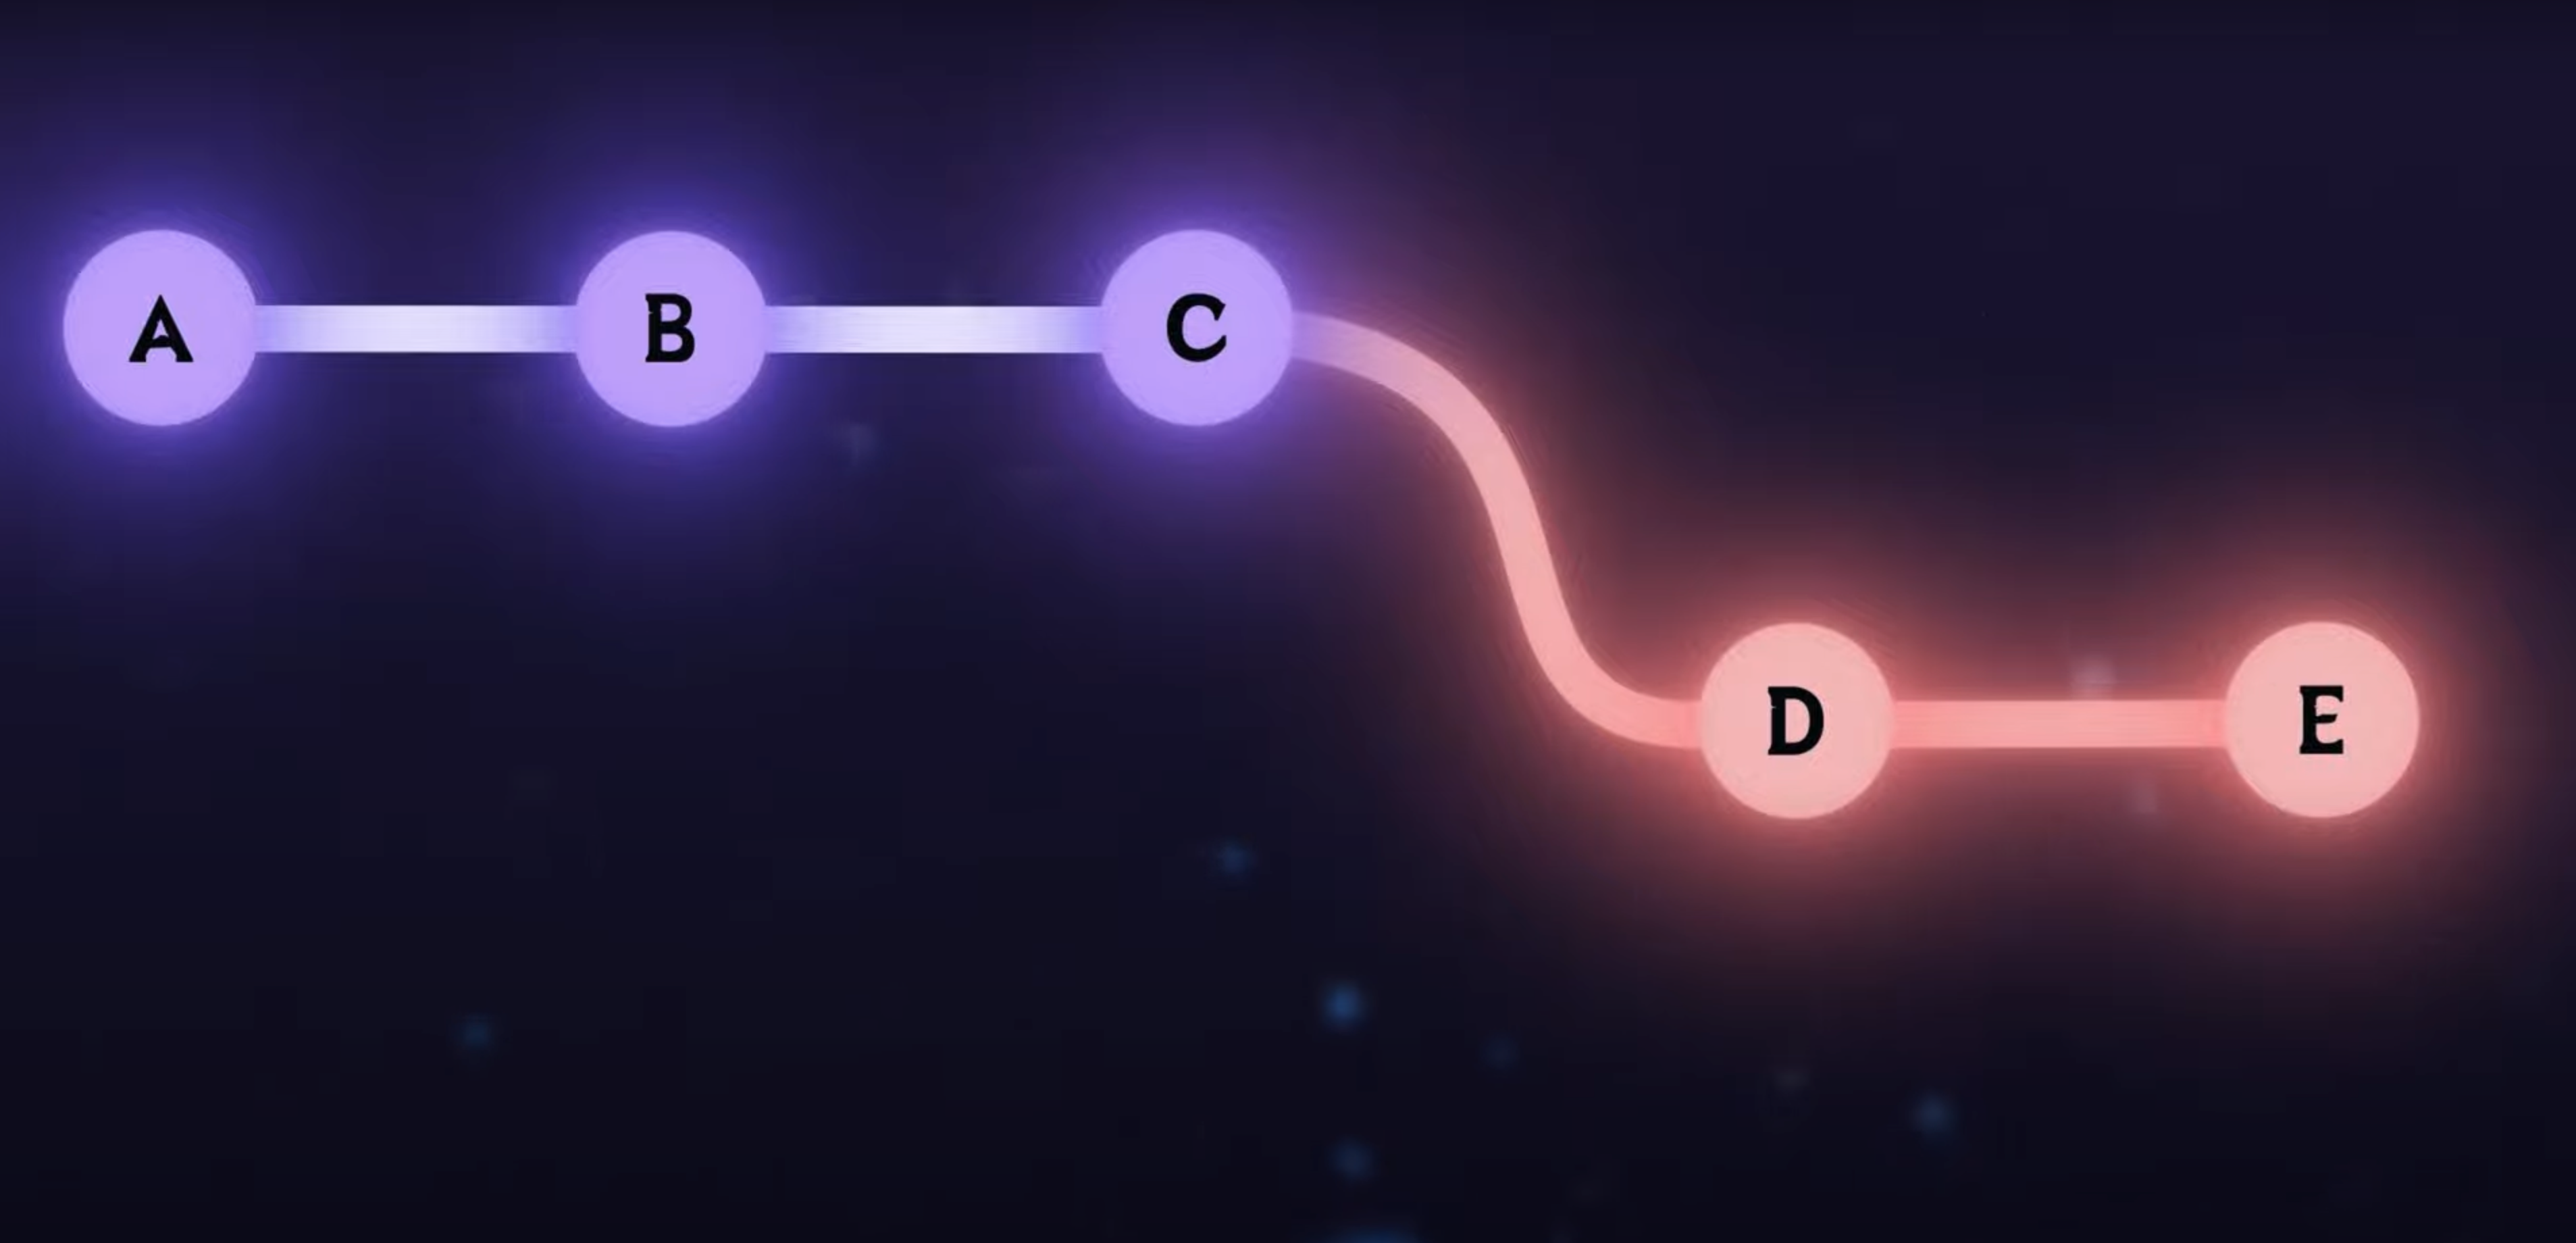
Image credits: Boot dev - https://www.youtube.com/watch?v=nHcfoHOW4uA
You can also chooose what commits you want to keep and which ones you want to discard. To do this you can do an interactive rebase by running the following command:
git rebase -i main
This will open a text editor with a list of all the commits in your branch, then you have keys that let you choose what to do with the commits, for example, to delete or drop one, press 'd'.
If you just want to combine many commits into one, you can squash them into one commit by pressing 's' on the commit you want to squash.
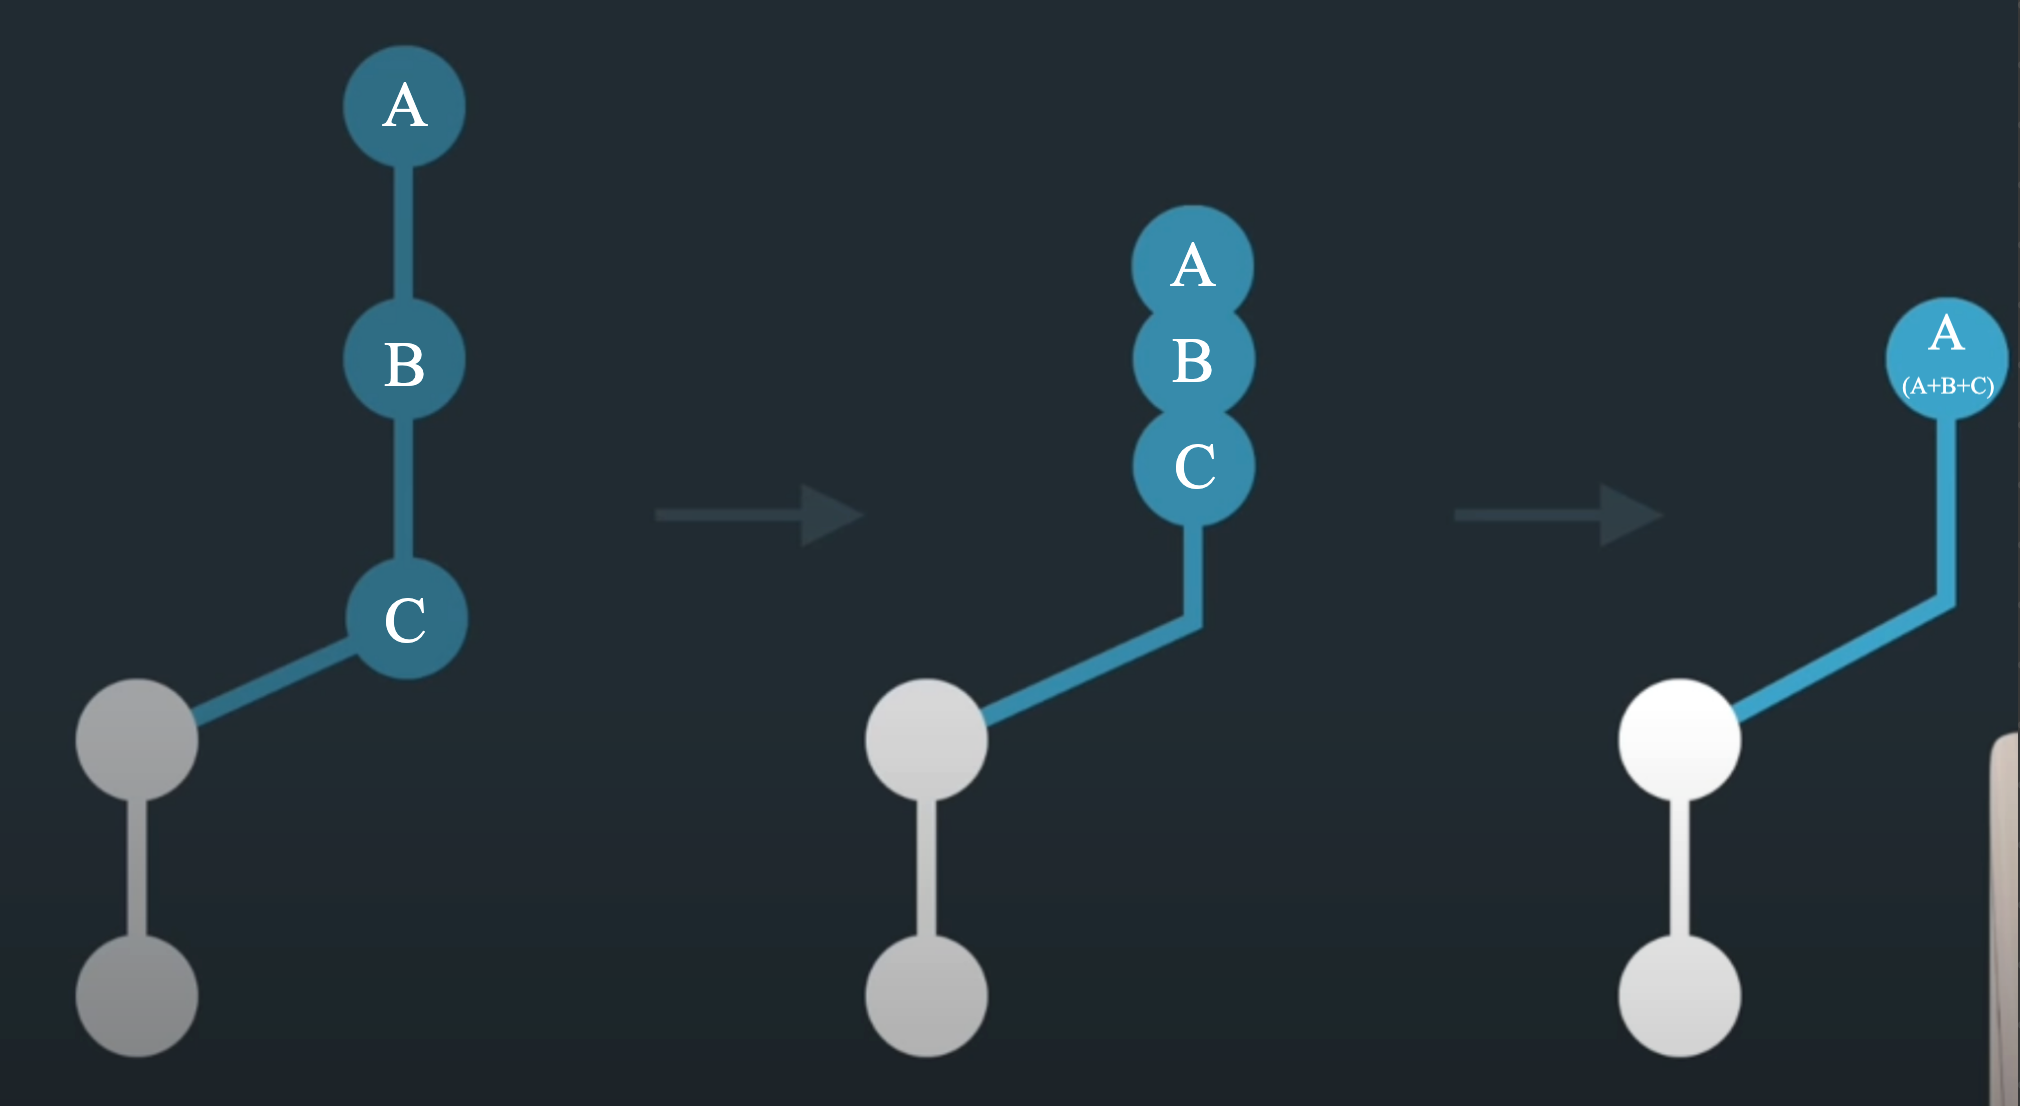
Image credits: The Modern Coder - https://www.youtube.com/watch?v=V5KrD7CmO4o
Dealing with conflicts and/or mistakes
Now if you're working with Git, chances are that you are going to stumble upon conflicts or make mistakes sooner or later. For example, imagine you're just chilling working on your branch, doing your thing, maybe adding a new feature or fixing a bug in a file and you finish, then you try to commit your changes but as it turns out, your colleague had also made some changes to the same file and pushed it to the remote repository. So now what you have on your hands is a conflict and if you want your changes to be implemented, you're going to have to resolve it. There are some different ways to resolve conflicts but the most common one is to open the file that has the conflict and you are going to see some places where you have a section with 2 pieces of code, one with the title "MAIN" and the other with your branch's name. These lines mark the beginning and end of the conflict and the lines in between are the changes that were made by you and your colleague, then you have to delete either your changes or your colleague's changes or both and keep the ones you want.
Reverting commits
Imagine this scenario: You're working on your branch on a group project and you finish your task. Ater finishind it you commit the changes to your branch. When you're done, you realize the you commited the wrong code or maybe the code is causing malfunctions in the project but there's no time to go about seeing what's wrong and fixing it because the production side has to be working for the users so what you can do is use this command:
git revert <commit-hash>
This will create a new commit that reverts the changes made in the commit you specified. This way you can work on fixing the code without affecting the production side of the project and then you can push those changes.

Image credits: Boot dev - https://www.youtube.com/watch?v=iIaM7j3tMuk
Resetting commits
Now let's say you made a commit and you want to undo it but you don't want to create a new commit that reverts the changes, you just want to go back to the state of the repository before the commit. To do this, you can use the following command:
git reset --hard <commit-hash>
This will reset your repository to the state of the commit you specified and all the changes made after that commit will be lost. This is useful if you want to go back to a previous state of the repository and you don't care about the changes made after that commit. However, if you want to go back to a previous state of the repository but you want to keep the changes made after that commit, you can use the following command:
git reset --soft <commit-hash>
ou just
git reset <commit-hash>
(by default it will be soft). This will reset your repository to the state of the commit you specified but it will keep the changes made after that commit in the staging area.
Stashing changes
Now let's say you have some changes in a branch but you need to take care of a very serious situation in another branch. Now you can't change branches because of your uncommited changes and you don't want to commit them yet because they are not ready. Fear not my friend, you can just stash your changes with th is command:
git stash
When you come back to your branch and want the changes back just run this:
git stash pop
In case you don't want the changes stashed anymore you can use this command:
git stash drop
In case you want to see the list of stashed changes you can use this command:
git stash list
Conclusion
In this blog post we have covered the basics of git and how to use it to manage your codebase. We have also covered some advanced topics such as branching, merging, rebasing, and stashing changes. We hope you found this blog post useful and that you will continue to use git to manage your codebase. Keep smashing keys playa! P.S.: I'll leave here a small cheat sheet in case you need to check some basic commands: https://education.github.com/git-cheat-sheet-education.pdf