
To maintain an integrated and optimized workflow in our project, we use Playwright as our end-to-end testing framework.
Goal: GitHub Integration for Test Automation
Situation (S) Our team needed an efficient way to ensure that rapid code changes didn’t introduce unexpected bugs. Manual testing was time-consuming and prone to oversight—especially as multiple pull requests would arrive daily. We lacked a quick feedback loop to catch regressions before merging.
Task (T) We aimed to establish a robust continuous integration (CI) pipeline that automatically ran end-to-end (E2E) tests on every push or pull request. By doing so, we hoped to reduce production defects, speed up feedback to developers, and increase confidence in new features.
Action (A) We integrated Playwright into our project and linked it with GitHub Actions. This involved:
- Installing Playwright with the recommended CLI commands.
- Generating a default workflow (.github/workflows/playwright.yml) for GitHub Actions.
- Customizing playwright.config.ts to optimize test execution.
- Ensuring that test results and artifacts (screenshots, HTML reports) were uploaded as GitHub Actions artifacts for easy debugging.
Result (R) By adding automated E2E tests and running them on GitHub Actions, we:
- Caught critical bugs earlier, reducing production incidents.
- Accelerated feedback loops, as developers could see failing tests directly on pull requests.
To ensure that test automation keeps up with the project's code updates and revisions, we integrate Playwright with Git. This integration enables:
- Continuous integration (CI/CD) pipelines triggered automatically on every push or pull request;
- Automatic test execution to prevent bugs before reaching production.
Why Choose Playwright?
Playwright stands out by offering support for:
- Multiple browsers: Chromium, Firefox, and WebKit;
- Multiple programming languages: JavaScript/TypeScript, Python, Java, and .NET.
It also provides benefits such as:
- Capturing screenshots and video recordings during test executions;
- Simulating devices and network conditions;
- Running tests in parallel and in "headless" mode (without a graphical interface).
Setting Up Playwright with GitHub Actions
Installing Playwright
Run the following command in your terminal:
npm init playwright@latest (for a new project)
npm playwright --with-deps (for an existing project)
During the Installation Process
You'll encounter several options:
TypeScript or JavaScript:
- For our project, we selected TypeScript.
Where to put end-to-end tests?
- We followed the recommendation to use the
/testsdirectory.
- We followed the recommendation to use the
Add GitHub Actions Workflow:
- Accepting this option generates the
.github/workflows/playwright.ymlfile.
- Accepting this option generates the
Install Playwright Browsers:
- Installs the necessary browsers for testing.
What Is Installed?
- Required browsers
- Automatically generated files:
playwright.config.tstests/directory.github/workflows/playwright.yml
In this moment, you have a fully functional Playwright setup with GitHub Actions integration. We will now explore the generated files and how to customize them for your project.
GitHub Actions Integration
One of the generated files is playwright.config.ts, which contains the configuration settings for Playwright tests. In our project we change some configurations to optimize the test execution.
In our project, we applied several configurations to shorten test times and improve reliability:
FullyParallel: true We wanted to run all tests in parallel (as opposed to just parallelizing test files) to reduce total execution time when there are many tests.
Workers: 2 This parameter controls how many tests run in parallel across multiple processes. By fine-tuning it, we balanced faster runs with stable resource usage in our CI environment.
Retries: process.env.CI ? 1 : 0 Intermittent network or environment issues can cause flaky tests in CI. A single retry in CI helps catch genuinely flaky failures without hiding consistent issues.
trace: 'on-first-retry' and screenshot: 'only-on-failure' These options help us collect diagnostic data only when a test fails. This saves disk space and speeds up runs that pass. With this configuration we get critical debug info (trace and screenshot) for failing tests, without the overhead of generating them every time.
Changes in playwright.config.ts
We updated the playwright.config.ts file with the following configurations:
import { defineConfig, devices } from '@playwright/test';

export default defineConfig({
  testDir: './tests',
  outputDir: 'test-results',
  /* Run tests in files in parallel */
  fullyParallel: true,
  /* Fail the build on CI if you accidentally left test.only in the source code. */
  forbidOnly: !!process.env.CI,
  /* Retry on CI only */
  retries: process.env.CI ? 1 : 0,
  /* Opt out of parallel tests on CI. */
  workers: 2,
  /* Reporter to use. See https://playwright.dev/docs/test-reporters */
  reporter: 'html',
  /* Shared settings for all the projects below. See https://playwright.dev/docs/api/class-testoptions. */
  use: {
    /* Base URL to use in actions like `await page.goto('/')`. */
    baseURL: "http://localhost:3001",

    /* Collect trace when retrying the failed test. See https://playwright.dev/docs/trace-viewer */
    trace: 'on-first-retry',
    screenshot: 'only-on-failure',
  },

  /* Configure projects for major browsers */
  projects: [
    {
      name: 'chromium',
      use: { ...devices['Desktop Chrome'] },
    },

    {
      name: 'firefox',
      use: { ...devices['Desktop Firefox'] },
    },

    {
      name: 'webkit',
      use: { ...devices['Desktop Safari'] },
    },

  ],

  /* Run your local dev server before starting the tests */
  webServer: {
    command: 'npm run start',
    url: "http://localhost:3001",
    reuseExistingServer: !process.env.CI,
  },
});
Configuration Details
General
testDir: Directory for end-to-end tests. Example:./tests.outputDir: Directory where logs and reports are stored. Example:"test-results".
Test Execution
fullyParallel: Enables full parallel test execution. See the official docs on parallel execution.true: All tests can run in parallel.false: Limits parallel execution to files.
retries: Number of retry attempts in case of failure. See retries configuration. Example:1.workers: Number of parallel threads used for execution. See workers. Example:2.
Reports and Tracing
reporter: Type of report generated. For more details, see the test reporters. Example:"html".trace: Generates detailed traces for debugging failures. See Tracing.'on-first-retry': Trace is generated only on the first retry attempt.
Global Configurations (use)
baseURL: Base URL used in tests. See baseURL docs. Example:"http://localhost:3001".screenshot: Automatically captures screenshots. See screenshot config.'only-on-failure': Only on failures.
Browser-Specific Configurations (projects)
- Chromium: Configuration for Chrome/Edge.
- Firefox: Configuration for Mozilla Firefox.
- WebKit: Configuration for Safari.
The configurations outlined above are a solid starting point but can be easily adjusted to suit the unique requirements of your project or testing environment.
Note:
In some projects, certain actions like logging in or preparing a specific state need to be executed before running the main tests. Playwright allows you to handle this efficiently by creating a dedicated setup project and making other projects dependent on it. This ensures that the setup runs only once and the state can be reused.
Here’s how you can configure a setup project:
projects: [
  {
    name: 'setup',
    testMatch: /.*\.setup\.ts$/, // Executes only the setup tests
  },
  {
    name: 'chromium',
    use: { ...devices['Desktop Chrome'] },
    dependencies: ['setup'], // Ensures setup is run first
  },
  {
    name: 'firefox',
    use: { ...devices['Desktop Firefox'] },
    dependencies: ['setup'],
  },
  {
    name: 'webkit',
    use: { ...devices['Desktop Safari'] },
    dependencies: ['setup'],
  },
],
In the setup project, you can implement actions like logging in and saving the authenticated state for reuse:
import { test } from '@playwright/test';

test('global setup', async ({ page }) => {
  await page.goto('/login');
  await page.fill('#username', 'test-user'); // Replace with your actual username field selector
  await page.fill('#password', 'password123'); // Replace with your actual password field selector
  await page.click('button[type="submit"]'); // Replace with your actual submit button selector
  await page.waitForURL('/example'); // Replace with your actual post-login URL
  await page.context().storageState({ path: 'auth.json' }); // Saves the authenticated state
});
Other tests can then reuse this authenticated state by including it in the configuration. For example:
test.use({ storageState: 'auth.json' });

test('Access protected page', async ({ page }) => {
  await page.goto('/exampleAccount');
  await expect(page.locator('h1')).toHaveText('Account Details');
});
This setup ensures that the authenticated state is saved and reused across tests, reducing the need to log in repeatedly and improving test efficiency.
Using data-testid and XPath
For more resilient tests, we often rely on data-testid attributes instead of regular CSS classes or IDs. In some scenarios, XPath can be useful for finding text-based elements. If you want to see a working example, check out our repository under tests/happyPathTest.test.ts, where we demonstrate:
- Selecting elements by
data-testidfor stable locators; - Locating text within a paragraph using XPath.
This approach helps keep tests robust, even if the styling or layout changes.
Also during installation, if you choose to integrate the GitHub Actions workflow, the file .github/workflows/playwright.yml is automatically generated with the following configuration:
name: Playwright Tests
on:
  push:
    branches: [ main, master ]
  pull_request:
    branches: [ main, master ]
jobs:
  test:
    timeout-minutes: 60
    runs-on: ubuntu-latest
    steps:
    - uses: actions/checkout@v4
    - uses: actions/setup-node@v4
      with:
        node-version: lts/*
    - name: Install dependencies
      run: npm ci
    - name: Install Playwright Browsers
      run: npx playwright install --with-deps
    - name: Run Playwright tests
      run: npx playwright test
    - uses: actions/upload-artifact@v4
      if: ${{ !cancelled() }}
      with:
        name: playwright-report
        path: test-results/
        retention-days: 3
Project
If you want to use this test project with this configuration, you can clone the repository from the following link:
git clone https://github.com/remoteflags/playwright-setup.git
After we push the code to the repository, the GitHub Actions workflow is triggered automatically. The workflow executes the Playwright tests and generates a report in the test-results directory.
The follow image shows a successful test execution in the GitHub Actions workflow:

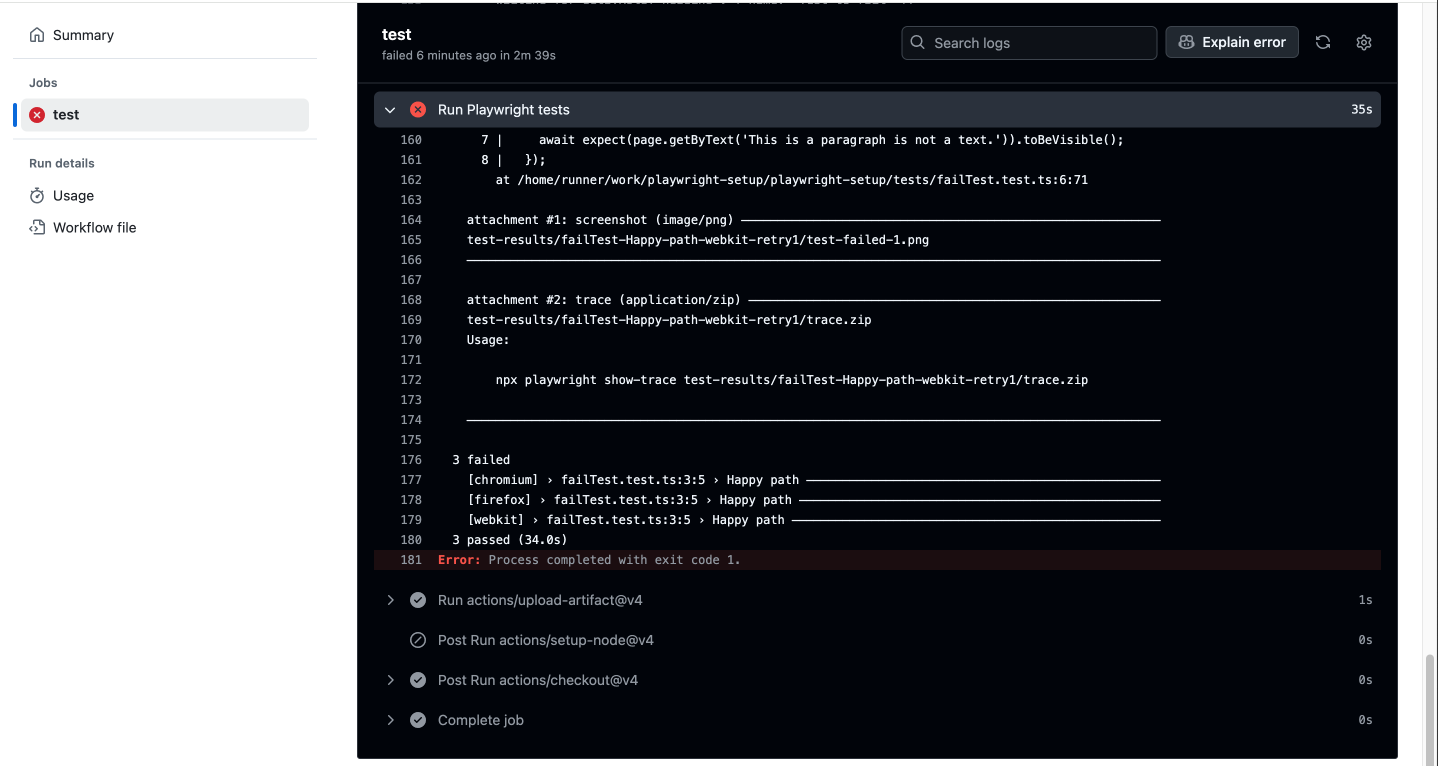
If the test fails, the workflow generates a report with detailed information about the failure:
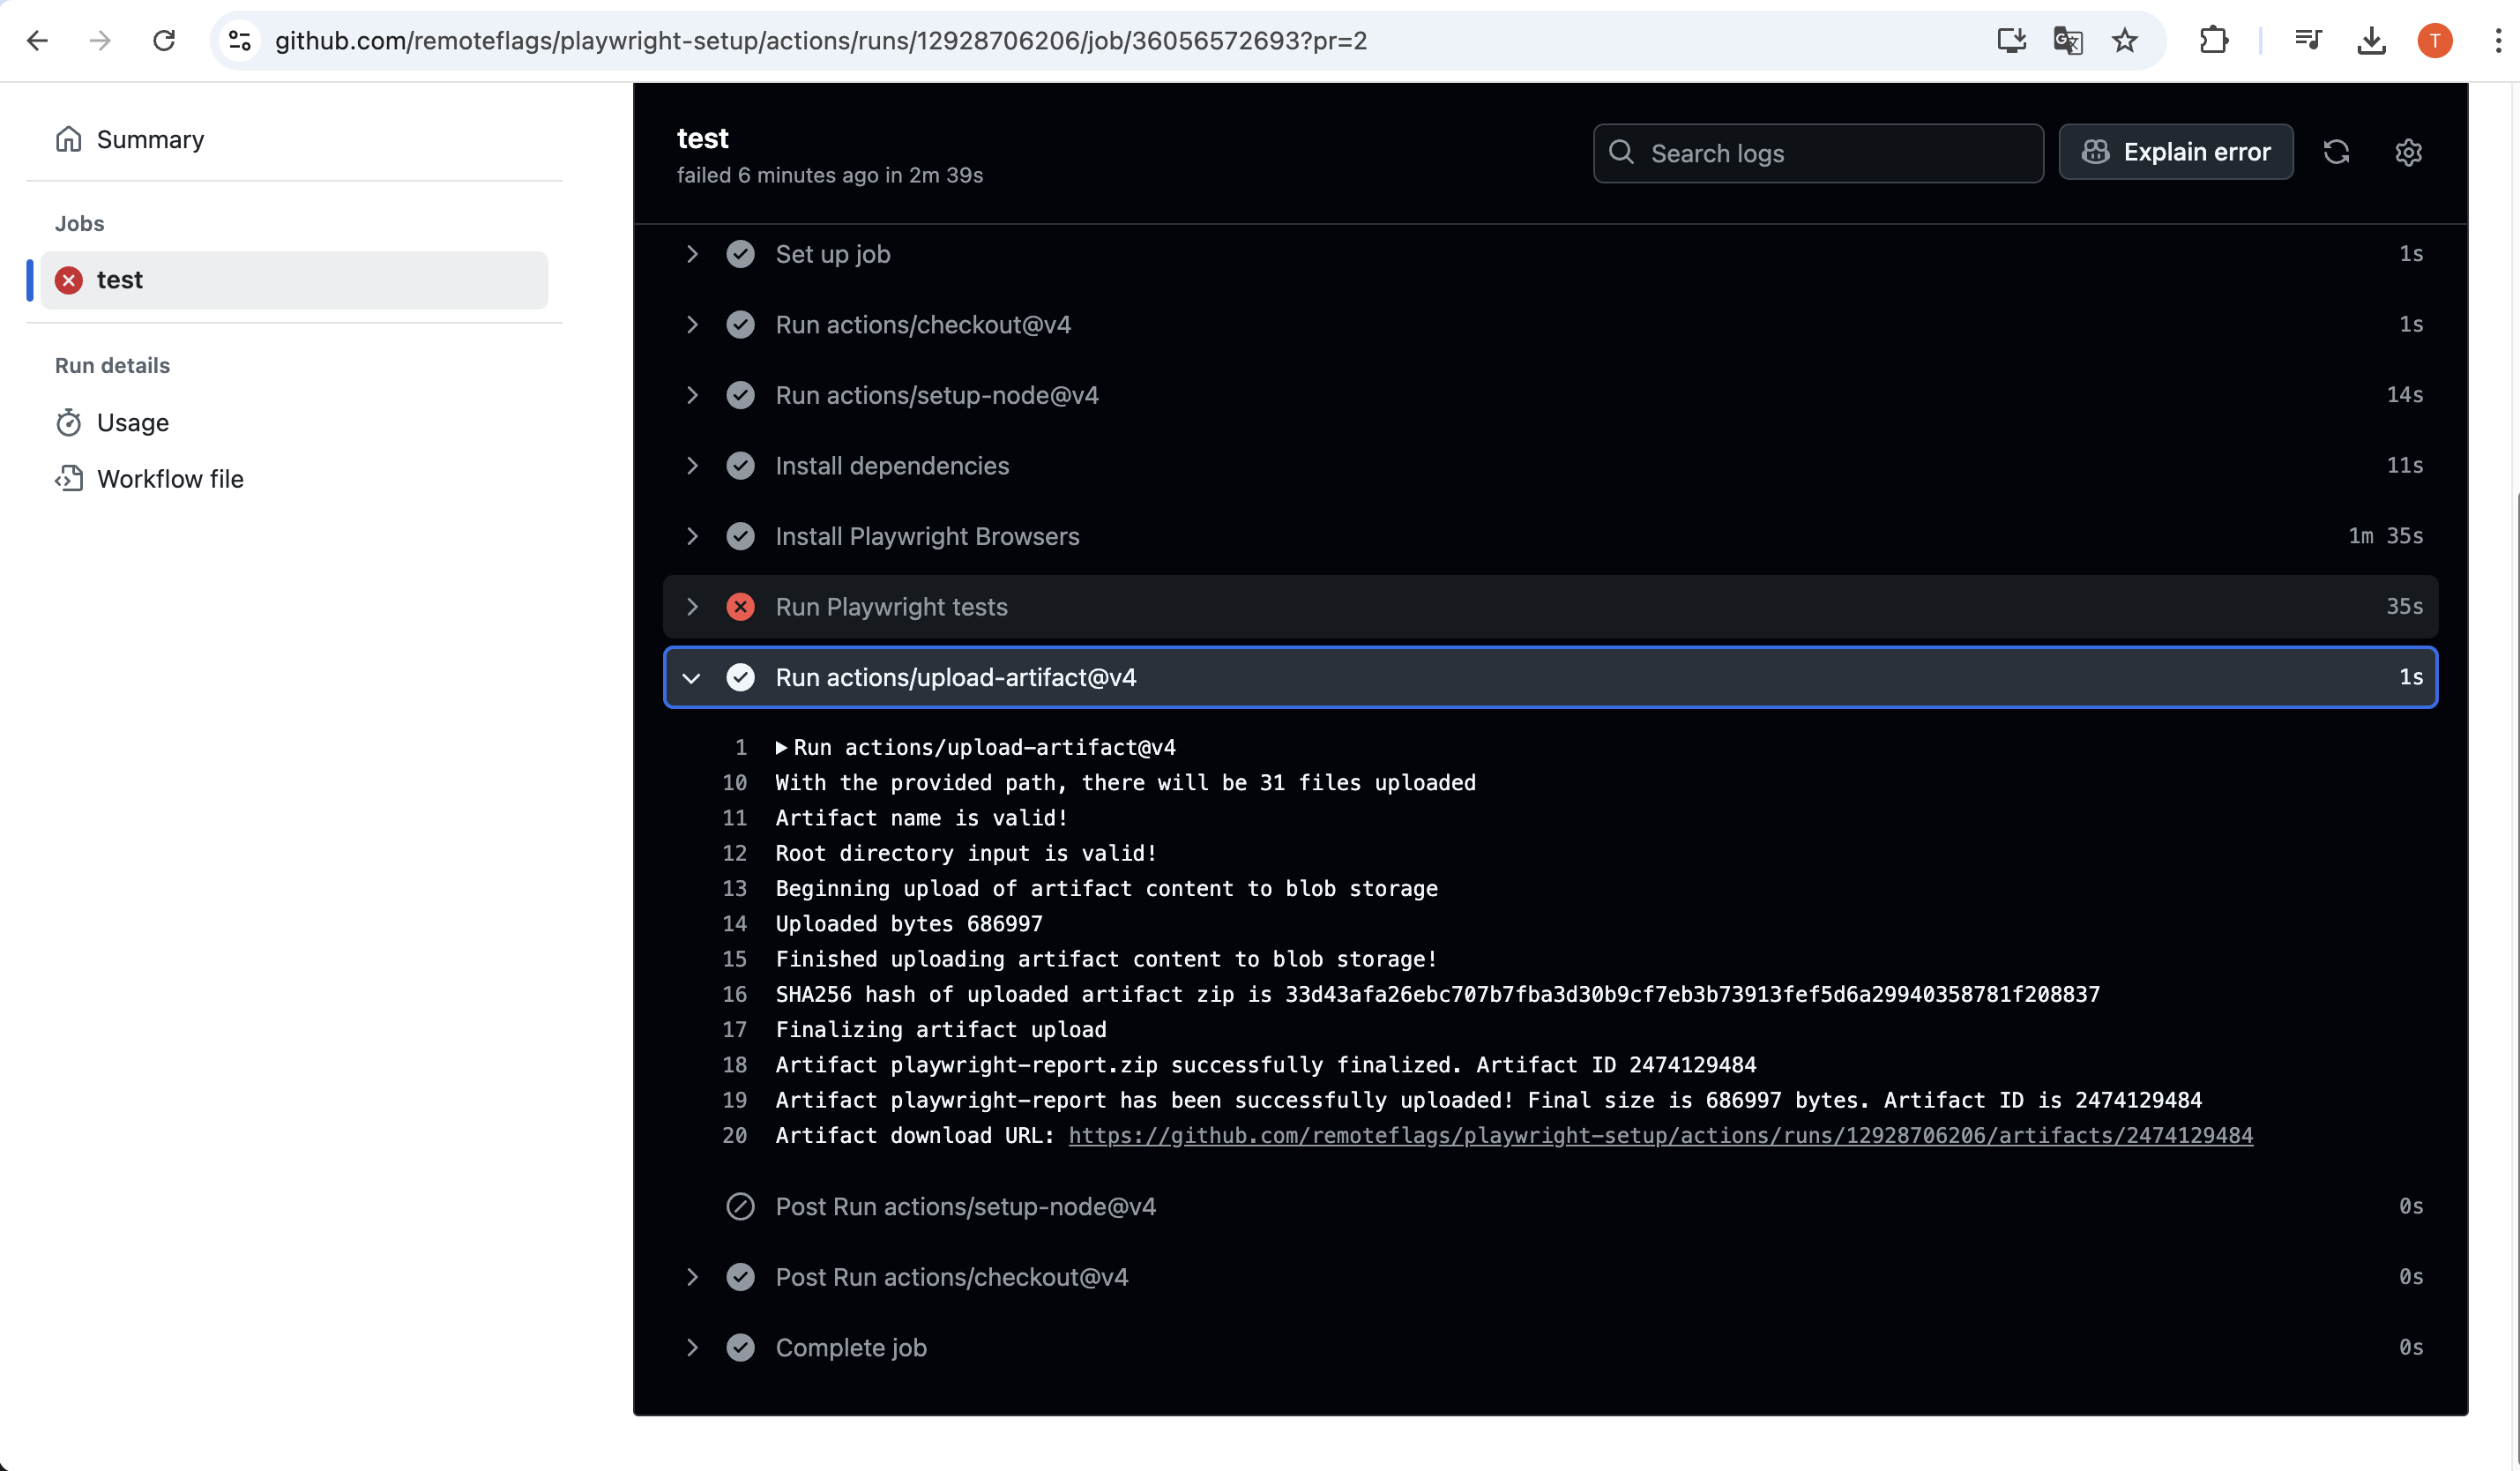
after this you can see the artifacts generated by the workflow using artifact download URL:
With this setup we create an automated test workflow that runs on new pull-requests and reduces the risk of production failures.